Showing posts with label gui. Show all posts

Monday, December 2, 2013

How To Use JFreeChart In Java

Do you want to visualize your data from your database in Java? Well some guy started to develop a FREE and very good chart library in Java. The good thing about this is that is it free and open source, so anytime you want to change something you want to meet your needs is just like a piece of cake.

First, you have to download the library itself JFreeChart download note it is being hosted on SourceForge.
If you're using Eclipse IDE this my post might come in handy to adding library to your classpath.

Create a new project and new class then copy/paste this code which I will be explaining later:


import javax.swing.JFrame;

import org.jfree.chart.ChartFactory;
import org.jfree.chart.ChartPanel;
import org.jfree.chart.JFreeChart;
import org.jfree.chart.plot.PiePlot3D;
import org.jfree.data.general.DefaultPieDataset;
import org.jfree.data.general.PieDataset;
import org.jfree.util.Rotation;


public class HelloChart extends JFrame {
 
 private static final long serialVersionUID = 1L;

 public HelloChart(String applicationTitle, String chartTitle) {
        super(applicationTitle);
        PieDataset dataset = createDataset();
        JFreeChart chart = createChart(dataset, chartTitle);
        ChartPanel chartPanel = new ChartPanel(chart);
        chartPanel.setPreferredSize(new java.awt.Dimension(500, 270));
        setContentPane(chartPanel);

    }
    
    private  PieDataset createDataset() {
        DefaultPieDataset result = new DefaultPieDataset();
        result.setValue("McDonalds", 40);
        result.setValue("Jolibee", 11);
        result.setValue("Subway", 9);
        return result;
        
    }

    private JFreeChart createChart(PieDataset dataset, String title) {
        JFreeChart chart = ChartFactory.createPieChart3D(title, dataset, true, true, false);
        PiePlot3D plot = (PiePlot3D) chart.getPlot();
        plot.setStartAngle(290);
        plot.setDirection(Rotation.CLOCKWISE);
        plot.setForegroundAlpha(0.5f);
        return chart;
    }
    public static void main(String args){
     HelloChart demo = new HelloChart("Comparison", "Which fast food are the best?");
        demo.pack();
        demo.setVisible(true);
 }
   
} 

Basically, what we need to render our chart is to make a dataset. In this example, we want created a DefaultPieDataSet and add some values in it. Then we make an instance of JFreeChart and customize it along with the dataset we have just created. Finally, we give it to our JFrame's  content pane for the user to see it. Here are one of the examples when you downloaded the library with demo file.

Try to explore the whole demo application and get helped in its forum and some tutorials. Thank you for reading my post!

Thursday, November 28, 2013

Getting Started With Java Look And Feel

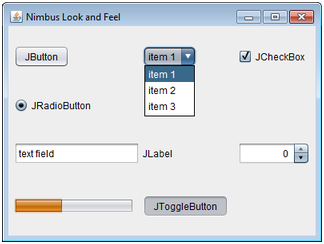
There are various look and feel bundled in the JDK you can choose from. I used to change my look and feel to almost all of my projects because I don't like the default Metal Look And Feel. Changing your java look and feel is really easy, with just a chunks of code. Here are the default Look and Feels bundled in the JDK when you downloaded it: (Note: The Window Title says what Look And Feel it is.)

Metal Look And Feel


Nimbus Look And Feel


Windows Look And Feel


Classic Look And Feel


Motif Look And Feel


I highly recommend you to download Eclipse because it is very easy to use and beginners can cope up with it in just an hour. After you have downloaded Eclipse, fire it up and create new project by going to
File > New > Java Project.

For the Project Name, come up with a good name that describes what your project is. After that, hit Finish button. Your Project appears at the left side of the Eclipse Window, you should now see your Project Structure.
Now right click on your new Java Project and select New > Class. Now name your new Class as "Main".
Eclipse then create Main.java file. It should look something like this:
public class Main {

}
Now go ahead and copy the codes below, I will explained it later:
import java.awt.FlowLayout;
import java.awt.Toolkit;

import javax.swing.*

public class Main {
 
 public Main(){
  JFrame frame = new JFrame("Nimbus Look and Feel");
  setLookAndFeel(frame);
  frame.setLayout(new FlowLayout());
  frame.add(new JButton("JButton"));
  frame.add(new JComboBox(new String[]{"item 1", "item 2", "item 3"}));
  frame.add(new JCheckBox("JCheckBox", true));
  frame.add(new JRadioButton("JRadioButton", true));
  frame.add(new JTextField("text field"));
  frame.add(new JLabel("JLabel"));
  frame.add(new JSpinner());
  JProgressBar bar = new JProgressBar(0, 100);
  bar.setValue(40);
  frame.add(bar);
  frame.add(new JToggleButton("JToggleButton", true));
  frame.setSize(400, 300);
  frame.setLocationRelativeTo(null);
  frame.setVisible(true);
  frame.setDefaultCloseOperation(JFrame.EXIT_ON_CLOSE);
 }
 
 public static void main(String args[]){
  new Main();
 }
 
 public static void setLookAndFeel(JFrame v){
  try{
   System.setProperty("sun.awt.noerasebackground", "true");
   UIManager.setLookAndFeel("com.sun.java.swing.plaf.nimbus.NimbusLookAndFeel");
   SwingUtilities.updateComponentTreeUI(v);
  }catch(Exception e){
   e.printStackTrace();
  }
 }

}
I assume you are already comfortable with Java Swing API before you change your java look and feel.
As you can see from the code, there's only a single method besides the main method, namely setLookAndFeel(JFrame v).
 It has a parameter that accepts a JFrame instance.
The static method of Class
 System setProperty(String, boolean); has been invoked to prevent the windows to flick while you are resizing it.
And Class
 UIManager'setLookAndFeel(String) is responsible for changing the Look And Feel of your Java Application.
Finally, we make sure that Swing updates our changes so we invoke
 SwingUtilities' updateComponentTreeUI(String).

There are 5 Look and Feel Classes in Java. They are:


1.     javax.swing.plaf.metal.MetalLookAndFeel
2.     com.sun.java.swing.plaf.nimbus.NimbusLookAndFeel
3.     com.sun.java.swing.plaf.motif.MotifLookAndFeel
4.     com.sun.java.swing.plaf.windows.WindowsLookAndFeel
5.     com.sun.java.swing.plaf.windows.WindowsClassicLookAndFeel

You only have to change one line of code, and that is:

UIManager.setLookAndFeel("YOUR PREFERRED LOOK AND FEEL CLASS HERE");


That's it! :) I will soon post about other Look and Feel that is not part of the JDK. Feel free to ask any questions or suggestions! Thank you for reading.

Getting Started With MigLayout

When I was in my college year, my Professors are teaching the basics on how to construct a simple Java GUI Application using the Layout Manager bundled in the JDK.
I found it hard to cope up at first but with small amount of time taking a read on some java swing tutorials on google, I can almost do exactly the way I want the GUI to look like. But the only thing that upset me is the fact that there's like a hundred lines of code before you achieved your ever wanting GUI Design.
And then I came across with this MigLayout. This Layout Manager simplifies your coding in Java.
You must have to read the Quick Start in MigLayout website because it is very handy.


I'm going to list some of the constraints I usually used when I'm working with MigLayout:

wrap - It makes the next component down to the next row. For Example:

import javax.swing.JButton;
import javax.swing.JFrame;
import javax.swing.JLabel;

import net.miginfocom.swing.MigLayout;
public class TestMigLayout extends JFrame{
 
 public TestMigLayout(){
  super("MigLayout Basic");
  setLayout(new MigLayout("", "[grow]", "[grow]"));
  add(new JLabel("Hello"), "wrap, center");
  add(new JButton("Exit"), "center");
  setDefaultCloseOperation(JFrame.EXIT_ON_CLOSE);
  pack();
  setLocationRelativeTo(null);
  setVisible(true);
 }
 public static void main(String args[]){
  new TestMigLayout();
 }
}
Output:

As you can see, the "wrap" parameter is responsible for making new row for the next component. 
The "center" parameter in the JPanel instance is to make the component to be on center position. You can also try to use "left" and "right".

growx - To make the component "grow" ONLY in its X axis. This is useful for Textbox or Button. There is also growy and simply, grow: for both x and y.
In the next example, we will try to make a simple login screen with "remember me" component. But with no implementations:

import javax.swing.JButton;
import javax.swing.JCheckBox;
import javax.swing.JFrame;
import javax.swing.JLabel;
import javax.swing.JPasswordField;
import javax.swing.JTextField;

import net.miginfocom.swing.MigLayout;
public class TestMigLayout extends JFrame{
 
 public TestMigLayout(){
  super("MigLayout Basic");
  setLayout(new MigLayout("", "[grow]", "[grow]"));
  add(new JLabel("Username:"), "right");
  add(new JTextField(), "growx, left, wrap, w 100");
  add(new JLabel("Password:"), "right");
  add(new JPasswordField(), "growx, left, wrap, w 100");
  add(new JCheckBox("Remember Me"), "center, wrap, span");
  add(new JButton("Login"), "split 2, span 2, center");
  add(new JButton("Close"));
  setDefaultCloseOperation(JFrame.EXIT_ON_CLOSE);
  pack();
  setLocationRelativeTo(null);
  setVisible(true);
 }
 public static void main(String args[]){
  new TestMigLayout();
 }
}

Output:

Pretty easy, right?! :)
The span constraint make the component to "eat" the specified number of column/row. This makes the component grow larger. In this case, its span 2, meaning we want our button to span 2 columns and 2 rows. Then the split constraint means the component cell can be occupied by specified number of column/row. In this case, we want our component to split into 2 so the next button will not jump to the next row.

Thanks for reading! Will be publish more about MigLayout soon.