There are various look
and feel bundled in the JDK you can choose from. I used to change my
look and feel to almost all of my projects because I don't like the default
Metal Look And Feel. Changing your java look and feel is really easy, with just
a chunks of code. Here are the default Look and Feels bundled in the JDK when you downloaded it: (Note: The Window
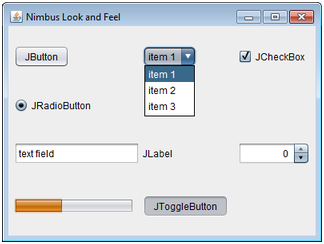
Title says what Look And Feel it is.)
Metal Look And Feel

Nimbus Look And Feel
Windows Look And Feel

Classic Look And Feel

Motif Look And Feel

I highly recommend you
to download Eclipse because it is very easy to use and
beginners can cope up with it in just an hour. After you have downloaded
Eclipse, fire it up and create new project by going to
File > New
> Java Project.
For the Project Name,
come up with a good name that describes what your project is. After that, hit
Finish button. Your Project appears at the left side of the Eclipse Window, you
should now see your Project Structure.
Now right click on your
new Java Project and select New > Class. Now name your new Class as
"Main".
Eclipse then create
Main.java file. It should look something like this:
public class Main {

}
Now go ahead and copy the codes below, I will explained it later:
import java.awt.FlowLayout;
import java.awt.Toolkit;

import javax.swing.*

public class Main {

 public Main(){
  JFrame frame = new JFrame("Nimbus Look and Feel");
  setLookAndFeel(frame);
  frame.setLayout(new FlowLayout());
  frame.add(new JButton("JButton"));
  frame.add(new JComboBox(new String[]{"item 1", "item 2", "item 3"}));
  frame.add(new JCheckBox("JCheckBox", true));
  frame.add(new JRadioButton("JRadioButton", true));
  frame.add(new JTextField("text field"));
  frame.add(new JLabel("JLabel"));
  frame.add(new JSpinner());
  JProgressBar bar = new JProgressBar(0, 100);
  bar.setValue(40);
  frame.add(bar);
  frame.add(new JToggleButton("JToggleButton", true));
  frame.setSize(400, 300);
  frame.setLocationRelativeTo(null);
  frame.setVisible(true);
  frame.setDefaultCloseOperation(JFrame.EXIT_ON_CLOSE);
 }

 public static void main(String args[]){
  new Main();
 }

 public static void setLookAndFeel(JFrame v){
  try{
   System.setProperty("sun.awt.noerasebackground", "true");
   UIManager.setLookAndFeel("com.sun.java.swing.plaf.nimbus.NimbusLookAndFeel");
   SwingUtilities.updateComponentTreeUI(v);
  }catch(Exception e){
   e.printStackTrace();
  }
 }

}
I assume you are already comfortable with Java Swing API before you change your java look and feel.
As you can see from the code, there's only a single method besides the main method, namely setLookAndFeel(JFrame v). It has a parameter that accepts a JFrame instance.
The static method of Class System setProperty(String, boolean); has been invoked to prevent the windows to flick while you are resizing it.
And Class UIManager's setLookAndFeel(String) is responsible for changing the Look And Feel of your Java Application.
Finally, we make sure that Swing updates our changes so we invoke SwingUtilities' updateComponentTreeUI(String).
There are 5 Look and Feel Classes in Java. They are:
That's it! :) I will soon post about other Look and Feel that is not part of the JDK. Feel free to ask any questions or suggestions! Thank you for reading.
As you can see from the code, there's only a single method besides the main method, namely setLookAndFeel(JFrame v). It has a parameter that accepts a JFrame instance.
The static method of Class System setProperty(String, boolean); has been invoked to prevent the windows to flick while you are resizing it.
And Class UIManager's setLookAndFeel(String) is responsible for changing the Look And Feel of your Java Application.
Finally, we make sure that Swing updates our changes so we invoke SwingUtilities' updateComponentTreeUI(String).
There are 5 Look and Feel Classes in Java. They are:
1.
javax.swing.plaf.metal.MetalLookAndFeel
2.
com.sun.java.swing.plaf.nimbus.NimbusLookAndFeel
3.
com.sun.java.swing.plaf.motif.MotifLookAndFeel
4.
com.sun.java.swing.plaf.windows.WindowsLookAndFeel
5.
com.sun.java.swing.plaf.windows.WindowsClassicLookAndFeel
You only have to change one line of code, and that is:
UIManager.setLookAndFeel("YOUR PREFERRED LOOK AND FEEL CLASS
HERE");
That's it! :) I will soon post about other Look and Feel that is not part of the JDK. Feel free to ask any questions or suggestions! Thank you for reading.
No comments:
Post a Comment