Friday, November 29, 2013

Java Interface - 4 Reasons Why Should You Use It


The Java Interface is one of the most essential things you should know especially if you want to create large scale system applications. In this post, I list 5 reasons why you should use java interface for your application.

Provides Clearer Code

Java Interface provides us much clearer code. This will help us to increase code readability since you are explicitly defining the function implementations.
public interface EntityLister{

 public void listStudentNames();
 public void listEmployeeNames();

}

public class SchoolAdministrator implements EntityLister {

 public void listStudentNames(){
  System.out.println("Listing student names");
 }
 
 public void listEmployeeNames(){
  System.out.println("Listing employee names");
 }
}
Here, you explicitly defined the functions in Class SchoolAdministrator. You won't feel the need of Java Interface if you're working on a relatively small projects, but I take it on me, code readability is one of the most important things you should consider.

Creates Polymorphism


Java Polymorphism is one of the most important concept in Object Oriented Programming. It is the ability of an object to react on different way in just a single and same call. Let's have an example. Suppose we have a parent interface called Car.
public interface Car{
 
 public void move();
 public void stop();
 public void turn();
}
Let's have a class called BMW and Ferrari that extends Class Car.
public class BMW implements Car{

 public void move(){
  System.our.println("moving..");
 }
 
 public void stop(){
  System.out.println("stopping..");
 }
}

public class Ferrari implements Car{

 public void move(){
  System.our.println("moving..");
 }
 
 public void stop(){
  System.out.println("stopping..");
 }
}

Now we can be able to make a call that affects different java objects. Let's create a class that demonstrate it.
public class TestCars{

 public static void main(String args[]){
  Car cars[] = new Car[2];
  cars[0] = new BMW("00-X1");
  cars[1] = new Ferrari("ZZ-43");
  for(Car car : cars){
   car.move();
   car.stop();
  }
 }
}

This is very essential especially if you want your codes to be more organized. Let's try to do the same thing without the use of polymorphism.
public class TestCars{

 public static void main(String args[]){
  BMW bmw = new BMW("");
  Ferrari ferrari = new Ferrari("");
  bmw.move();
  bmw.stop();
  ferrari.move();
  ferrari.stop();
 }
}

Now let's say we have say 200 different java class. Do you still want to use the above method? You would have to manually call every method in 200 java class which is pretty redundant. So java polymorphism promotes code flexibility.

Additional Capabilities


I'm not sure if you're going to agree with me if I say Java Interface can add a new feature to class. Let's take a look at my example.
public class FlyingObjects{
 public void fly(){
  System.out.println("flying..");
 }
 
 public void land(){
  System.out.println("landing..");
 }
}

public class Airplane extends FlyingObjects{
 
}
Suppose we just don't want the Airplane to fly but we want it to have a special ability to make itself invisible.
public interface Hideable{
 
 public void hide();
}

public class FlyingObjects{
 public void fly(){
  System.out.println("flying..");
 }
 
 public void land(){
  System.out.println("landing..");
 }
}

public class Airplane extends FlyingObjects implements Hideable{
public void hide(){
  System.out.println("hiding..");
 }
}
Using Java Interface, we add a new method to the Class Airplane without deleting the fact that it was an Airplan that can fly and land.

Multiple Inheritance


You can implement as many Java Interface as you can in your Java Class without any errors. This is one of the big advantages of Java Interface. This cannot be done with Java Inheritance. Let's take a look to my example.
public interface Hideable(){
 public void hide();
}

public interface Flyable(){
 public void fly();
}

public interface Shootable(){
 public void shoot();
}

public class Warrior implements Hideable, Flyable, Shootable{
 public void hide(){
  System.out.println("Hiding..");
 }
 
 public void fly(){
  System.out.println("Flying..");
 }
 
 public void shoot(){
  System.out.println("Shooting..");
 }
 
}
This codes will compile without any error. Let's see what will happen if we did not use Java Interface and we want to avail different methods.
public class Hideable(){
 public void hide(){
  System.out.println("Hiding..");
 }
}

public class Flyable(){
 public void fly(){
  System.out.println("Flying..");
 }
}

public class Shootable(){
 public void shoot(){
  System.out.println("Shooting..");
 }
}

public class Warrior extends Hideable, Flyable, Shootable{
 // THIS WILL BE AN ERROR
 
}
This will be a compilation error because you can only extends one class. That's why we should want to use Java Interface if we want to have multiple inheritance that could promote polymorphism.
Thanks for reading my post. :)

Thursday, November 28, 2013

Getting Started With TinyLaf - Change Your Java Look And Feel

Have you had enough of the default theme of your first java application? TinyLAF provides an alternative theme for your java application that I'm sure you're going to love. They provide some screenshots of how would your application window look like.
Using the TinyLAF

To use the TinyLaf, you need to download its binary and add it to your java build path. You also need to download its source code so you can choose which theme you wanted to use. Extract the archieved file and look for the themes directory. Now you have to choose which theme you would like to use. Copy the particular theme to your project root directory and rename it to "Default.theme". Now everything is setup correctly. I recommend you to use Eclipse IDE for easier and simpler addition of your third party libraries. 


import java.awt.FlowLayout;
import java.awt.Toolkit;

import javax.swing.JDialog;
import javax.swing.JFrame;
import javax.swing.SwingUtilities;
import javax.swing.UIManager;


public class Tiny extends javax.swing.JFrame{
 
 public static void main(String ars[]){
  new Tiny();
 }
 
 public void setLookAndFeel(){
  Toolkit.getDefaultToolkit().setDynamicLayout(true);
  System.setProperty("sun.awt.noerasebackground", "true");
  JFrame.setDefaultLookAndFeelDecorated(true);
  JDialog.setDefaultLookAndFeelDecorated(true);

  try {
      UIManager.setLookAndFeel("de.muntjak.tinylookandfeel.TinyLookAndFeel");
      SwingUtilities.updateComponentTreeUI(this);
  } catch(Exception ex) {
      ex.printStackTrace();
  }
 }
 
 public Tiny(){
  setLookAndFeel();
  setTitle("Java Look and Feel"); 
  setDefaultCloseOperation(EXIT_ON_CLOSE); 
  setLayout(new FlowLayout());
  add(new javax.swing.JButton("Hello"));
  add(new javax.swing.JCheckBox("World!"));
  add(new javax.swing.JLabel("TinyLaf"));
  add(new javax.swing.JComboBox(new String[]{"Java"}));
  add(new javax.swing.JButton("Theme!"));
  pack();
  setLocationRelativeTo(null);
  setVisible(true);
 }
}
You can copy and paste the code above on your editor and compile it. The generated result would look something like this:

Nightly Look And Feel


Forest Look And Feel


Silver Look And Feel


That's basically all it is. Pretty is, eh? If you are having a trouble to using the TinyLAF, just ask here on this post and I'm more than glad to answer your question. Have nice day to all of you!


Getting Started With Java Look And Feel

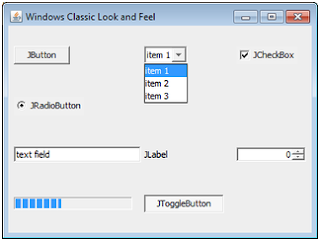
There are various look and feel bundled in the JDK you can choose from. I used to change my look and feel to almost all of my projects because I don't like the default Metal Look And Feel. Changing your java look and feel is really easy, with just a chunks of code. Here are the default Look and Feels bundled in the JDK when you downloaded it: (Note: The Window Title says what Look And Feel it is.)

Metal Look And Feel


Nimbus Look And Feel


Windows Look And Feel


Classic Look And Feel


Motif Look And Feel


I highly recommend you to download Eclipse because it is very easy to use and beginners can cope up with it in just an hour. After you have downloaded Eclipse, fire it up and create new project by going to
File > New > Java Project.

For the Project Name, come up with a good name that describes what your project is. After that, hit Finish button. Your Project appears at the left side of the Eclipse Window, you should now see your Project Structure.
Now right click on your new Java Project and select New > Class. Now name your new Class as "Main".
Eclipse then create Main.java file. It should look something like this:
public class Main {

}
Now go ahead and copy the codes below, I will explained it later:
import java.awt.FlowLayout;
import java.awt.Toolkit;

import javax.swing.*

public class Main {
 
 public Main(){
  JFrame frame = new JFrame("Nimbus Look and Feel");
  setLookAndFeel(frame);
  frame.setLayout(new FlowLayout());
  frame.add(new JButton("JButton"));
  frame.add(new JComboBox(new String[]{"item 1", "item 2", "item 3"}));
  frame.add(new JCheckBox("JCheckBox", true));
  frame.add(new JRadioButton("JRadioButton", true));
  frame.add(new JTextField("text field"));
  frame.add(new JLabel("JLabel"));
  frame.add(new JSpinner());
  JProgressBar bar = new JProgressBar(0, 100);
  bar.setValue(40);
  frame.add(bar);
  frame.add(new JToggleButton("JToggleButton", true));
  frame.setSize(400, 300);
  frame.setLocationRelativeTo(null);
  frame.setVisible(true);
  frame.setDefaultCloseOperation(JFrame.EXIT_ON_CLOSE);
 }
 
 public static void main(String args[]){
  new Main();
 }
 
 public static void setLookAndFeel(JFrame v){
  try{
   System.setProperty("sun.awt.noerasebackground", "true");
   UIManager.setLookAndFeel("com.sun.java.swing.plaf.nimbus.NimbusLookAndFeel");
   SwingUtilities.updateComponentTreeUI(v);
  }catch(Exception e){
   e.printStackTrace();
  }
 }

}
I assume you are already comfortable with Java Swing API before you change your java look and feel.
As you can see from the code, there's only a single method besides the main method, namely setLookAndFeel(JFrame v).
 It has a parameter that accepts a JFrame instance.
The static method of Class
 System setProperty(String, boolean); has been invoked to prevent the windows to flick while you are resizing it.
And Class
 UIManager'setLookAndFeel(String) is responsible for changing the Look And Feel of your Java Application.
Finally, we make sure that Swing updates our changes so we invoke
 SwingUtilities' updateComponentTreeUI(String).

There are 5 Look and Feel Classes in Java. They are:


1.     javax.swing.plaf.metal.MetalLookAndFeel
2.     com.sun.java.swing.plaf.nimbus.NimbusLookAndFeel
3.     com.sun.java.swing.plaf.motif.MotifLookAndFeel
4.     com.sun.java.swing.plaf.windows.WindowsLookAndFeel
5.     com.sun.java.swing.plaf.windows.WindowsClassicLookAndFeel

You only have to change one line of code, and that is:

UIManager.setLookAndFeel("YOUR PREFERRED LOOK AND FEEL CLASS HERE");


That's it! :) I will soon post about other Look and Feel that is not part of the JDK. Feel free to ask any questions or suggestions! Thank you for reading.

Getting Started With MigLayout

When I was in my college year, my Professors are teaching the basics on how to construct a simple Java GUI Application using the Layout Manager bundled in the JDK.
I found it hard to cope up at first but with small amount of time taking a read on some java swing tutorials on google, I can almost do exactly the way I want the GUI to look like. But the only thing that upset me is the fact that there's like a hundred lines of code before you achieved your ever wanting GUI Design.
And then I came across with this MigLayout. This Layout Manager simplifies your coding in Java.
You must have to read the Quick Start in MigLayout website because it is very handy.


I'm going to list some of the constraints I usually used when I'm working with MigLayout:

wrap - It makes the next component down to the next row. For Example:

import javax.swing.JButton;
import javax.swing.JFrame;
import javax.swing.JLabel;

import net.miginfocom.swing.MigLayout;
public class TestMigLayout extends JFrame{
 
 public TestMigLayout(){
  super("MigLayout Basic");
  setLayout(new MigLayout("", "[grow]", "[grow]"));
  add(new JLabel("Hello"), "wrap, center");
  add(new JButton("Exit"), "center");
  setDefaultCloseOperation(JFrame.EXIT_ON_CLOSE);
  pack();
  setLocationRelativeTo(null);
  setVisible(true);
 }
 public static void main(String args[]){
  new TestMigLayout();
 }
}
Output:

As you can see, the "wrap" parameter is responsible for making new row for the next component. 
The "center" parameter in the JPanel instance is to make the component to be on center position. You can also try to use "left" and "right".

growx - To make the component "grow" ONLY in its X axis. This is useful for Textbox or Button. There is also growy and simply, grow: for both x and y.
In the next example, we will try to make a simple login screen with "remember me" component. But with no implementations:

import javax.swing.JButton;
import javax.swing.JCheckBox;
import javax.swing.JFrame;
import javax.swing.JLabel;
import javax.swing.JPasswordField;
import javax.swing.JTextField;

import net.miginfocom.swing.MigLayout;
public class TestMigLayout extends JFrame{
 
 public TestMigLayout(){
  super("MigLayout Basic");
  setLayout(new MigLayout("", "[grow]", "[grow]"));
  add(new JLabel("Username:"), "right");
  add(new JTextField(), "growx, left, wrap, w 100");
  add(new JLabel("Password:"), "right");
  add(new JPasswordField(), "growx, left, wrap, w 100");
  add(new JCheckBox("Remember Me"), "center, wrap, span");
  add(new JButton("Login"), "split 2, span 2, center");
  add(new JButton("Close"));
  setDefaultCloseOperation(JFrame.EXIT_ON_CLOSE);
  pack();
  setLocationRelativeTo(null);
  setVisible(true);
 }
 public static void main(String args[]){
  new TestMigLayout();
 }
}

Output:

Pretty easy, right?! :)
The span constraint make the component to "eat" the specified number of column/row. This makes the component grow larger. In this case, its span 2, meaning we want our button to span 2 columns and 2 rows. Then the split constraint means the component cell can be occupied by specified number of column/row. In this case, we want our component to split into 2 so the next button will not jump to the next row.

Thanks for reading! Will be publish more about MigLayout soon.